See also: VIDEO – How to add or delete an email from your automated email sequence
- Add another email to your automated email drip campaign sequence
Note: Changes made to your email sequence will not apply to existing active recipients. Only recipients activated after changes are made will receive the revised sequence.
Navigate to Dashboard > Invites > Email.
On the left side of the screen, click Add an Email.

You’ll see the following panel appear:

- First, use the Email name (internal) box to set an internal name for your email that makes it easily identifiable.
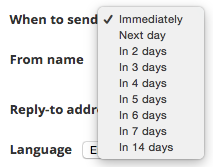
- Specify when you would like the new email to be sent in When to send (note that all dates refer to the number of days after the recipient is added to the list. After you select a date, you will be able to select a time of day (except when selecting Immediately).

- Specify a subject line.
Finally, compose your email using our full-featured HTML editor. Note that we provide a small number of placeholder tags to help you personalize your emails to each customer:
- [[first_name]] – adds the recipient’s first name
- [[last_name]] – adds the recipient’s last name
- [[profile_name]] – adds the business name as it appears on the landing page
- [[profile_url]] – adds your landing page URL
- [[profile_short_url]] – adds a shortened landing page URL
- [[profile_address]] – add the business address as it appears in Dashboard > Funnel > Links > Review Profile.
Using a custom footer
At the bottom of the email creation menu, toggle on the Use custom footer? checkbox.
![]()
You’ll then be able to add in your custom email footer. When creating your footer, keep in mind the following:
- You must use the [[unsubscribe]] placeholder somewhere in your footer – this adds the unsubscribe link. You can change the Unsusbscribe link text in the corresponding box.
- We strongly recommend using the [[profile_address]] placeholder to put the business address in the footer.

The end footer result will look similar to this:

When you’re finished, click ‘Create Email’.
