- Make changes to your existing drip campaign emails
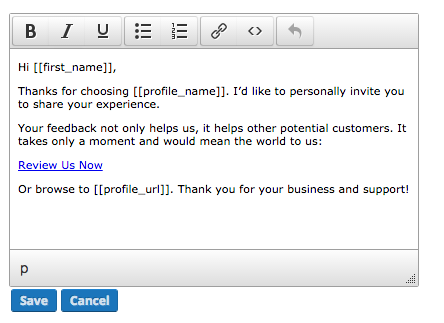
You may want to edit the default text of your drip campaign emails to better suit the tone and specifics of your business. Navigate to Dashboard > Invites > Email.

Select the message you would like to edit on the left side of the screen.

Hover over the field that you would like to edit until it is highlighted and a pencil appears, then click on the field.

If you are editing the email text, click ‘Save’ to save your changes (note that this section can accommodate styling in the form of HTML – simply click the <> button in the editor to add in your pre-made HTML message). Changes to other fields will reflect immediately (note that changes to the ‘Sent’ field will reflect on the left-hand side of the screen when you refresh the page).

We provide a small number of placeholder tags to help you personalize your emails to each customer:
- [[first_name]] – adds the recipient’s first name
- [[last_name]] – adds the recipient’s last name
- [[profile_name]] – adds the business name as it appears on the landing page
- [[profile_url]] – adds your landing page URL
- [[profile_address]] – adds the business address as it appears in Dashboard > Funnel > Links > Review Profile (Connect a Location must be complete)
You can send yourself a test email by clicking the Send a Test button below the email text.

Editing the footer or unsubscribe link
You can add a custom footer to a brand new email created from scratch. You cannot add a custom footer to the default templates.